Now, these decals are a bit more tedious than most, as they are 26 years old and are quite fragile. If not for old school folks like Gary Prange who has been involved in the business for so long, this type of resto would never be possible, so a big thanks to SSSink for hooking us up.
Ok, so last time we shared, I had sprayed on the color and the first coat of clear, and here's what we have...
 Before we begin, you need to understand that the frame must be ready for the next phase of paint before we begin. So, insure that your hands are gloved or well cleaned and oil free, your work area is prepped, and you have the time to follow through.
 The frame gets sanded down with a light rubbing with 600 grit paper to begin to level out the finish, prepare a mechanical tooth for the next layer to adhere to and to prepare for the decals to transfer easily.
 Once the frame is fully sanded, it's time to get all the pieces parts together...here we have the original decals and two repros of the Reynolds 531 tubing markers. Sitting alongside is a soft plastic debasing tool.
 The frame then gets blown off with filtered air to remove the dust from the sanding...
 The decals are basically four layers; a thin protective sheet that keeps the adhesive side of the decal dust free, the decal transfer it's self, the transparent transfer sheet, and an adhesive cardstock to protect the decal from wrinkling/bending. Here you can see the three layers separating...the actual decal sandwiched inside.
 These are super duper fragile and once placed gently on the frame, must not be moved or the decal will tear...you get one shot to place it properly. As the back side is not very sticky, I gently place the transfer, smooth the piece down from the center to the outer edges, and then hold the clear transfer down around the tube on both ends so that it does not lift.
 To release the decal, it must be debased using friction. I use a soft plastic debasing tool to rub down the decal from the center out to all edges, insuring that all surfaces are covered well.
 Once you believe the decal has been properly debased, do it again. These transfers like to tear at the little points, like small letters, the leading edge of graphics, etc... the more you rub, the better. When you are ready, begin at the side that has the longer smooth edges of the design and begin to pull the transfer sheet back over it's self slowly, feeling for any resistance and listening for a consistent sound. If you feel any resistance, stop immediately, lay the transfer sheet gently back down, and debase it more. It should lift free easily and evenly.
 Once off, visually inspect the decal to insure that it is laying flat on the tube and has no edges raised. If you need to press down a section, use the original side of the transfer sheet, not your finger. Here she is, looking good.
 The double sided down tube decals on this Fat are a real ass clencher, as the shooting star trails are just begging to tear due to their long narrow nature. Add to that the long surface area of the transfer sheet and it's a lot of stuff to watch, remove, control at once.
 And here is the downtube decal properly laid...
 Little ones like this tubing transfer are a bear, as every little letter is a sticky point...
 Once all the pieces are down, it's time to lay down a protective layer of clear...
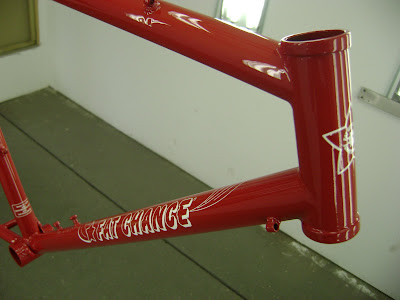
The frame will get a brief flash bake to set the clear, then allowed to harden for a couple of days before sanding again to prepare for the next layer.
So there ya go, decal application 101 for dry transfer appliques. Next class will have to discuss waterslide and dry vinyl techniques.
cheers,
rody
1 comment:
great post.
Post a Comment