After brazing up the bosses and the pinch bolt for the seat tube, it's time to slot the binder bolt. I set up in the mill and give the piece two passes with a slitting saw, giving us a nice clean cut.
 Once the slot is in place, I rotated the seat tube and used an end mill to put a clean shape to the end of the slot.
  The interior of the seat tube is then filed smooth, sanded, and washed/degreased. Phew...now it's time to start tacking the main triangle together... I start off by tacking the seat tube to the bottom bracket, a nice short run on the front of the tube that will be hidden underneath the down tube intersection.
 I work my way around the frame, tacking in the vertical positions first to maintain alignment without any lateral pull, then move to the side positions. I usually end up putting 8 small tacks around each tube, working sequentially around the frame. The tacks are made with no or very little filler, as the bead will be run over them and the lower profile maintains visual uniformity when everything is done.
 Once all the tubes are tacked, I begin welding the frame in the fixture, and Wah-Lah! Everything is done; here's the bottom bracket/seat tube/down tube intersection...
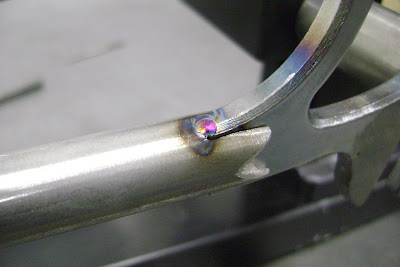
 and a pic of the seat tube/top tube intersection...notice how the HAZ (heat affected zone) is uniform the entire way around? By running a quick constant amperage and tapping in the filler, I'm able to avoid lingering in any one area too long, keeping the heat input to a minimum.
 After welding up the front triangle, I had some fabrication to do. As Jay is going to be using a dedicated Rohloff drivetrain, I need to use a dropout on the left side of the bike that allows the OEM axel plate to be secured without any yucky leverage arms or speedbones. Unfortunately, there is a short supply of dedicated fixed dropouts for Rohloffs, so I fabbed up some for my project. As time before the show is short, I shamelessly used Paragons basic design to speed up the process. I used the Paragon shape as a pattern on some blank steel, added in the extended slot necessary for the Rohloff axel plate and some transitional curves, then headed to the mill to begin cutting out the shape. Though they don't look that difficult, it definitely took some time, they came out pretty spiffy though.
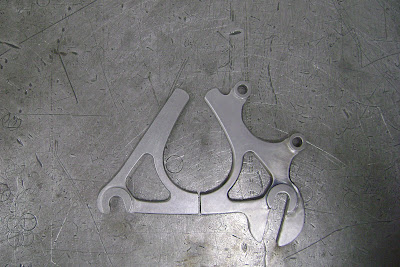
With the dropouts ready it was time for lunch...Cheesesteak deluxe from Hero House, yummy!

With the dropouts in place, I cut, shaped, and tacked in the chainstays.
 mitered and mocked up in the fixture...
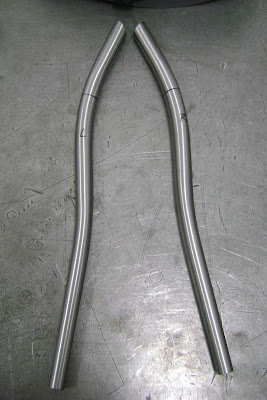
with the chainstays in place, I got to work on the seatstays. These will have some nice S bends to gently sweep around the tires, some Ignitor 2.1's for the road/trail use they'll see.
 A quick shot of the progress thus far...back at the stays in the morning when I'm fresh.
  Feeling better today, but still not real sharp in the head. Jay sent a care package with some parts and a few of the items his company makes...some cool clampy things, not sure what they are for but I'm pretty sure this is not it.
Back at ya tomorrow,
rody
2 comments:
Rody, have you noticed the comments on FatCogs speculating that if you really want the perfect Yo Eddy, just get a Groovy. Thought you might like that, and it gets me thinking, too.
Paul,
Unfortunately, my available time to surf for my own enjoyment is limited, so I've not been on Fat Cogs. However, the sentiment is very kind. Chris and the guys were very successful at bringing a level of craftsmanship and fun to cycling, something I hope to achieve some day as well :)
cheers,
rody
Post a Comment